Construction tab
The Construction Tree displays the Building, Levels, Floor Plan Images, Rooms, and Components of the building constructions. All building elements appear in a nested structure, from Building, Levels, Rooms, Walls, Windows and Doors. Use Expand/Collapse all from an element to act on all items below.
-
Building elements may be edited or deleted from the project using the Edit and Delete icons, respectively. Items selected in the Construction Tree are highlighted in the Drawing Canvas and 3D Views.
-
Rename building elements including Levels, Rooms, Walls, Windows, Doors, etc. using F2 or right-click to access the context menu. Shared items (internal walls or windows/doors) that are expanded in both places will not be renamed.
-
Plenum walls are displayed within their own category which is collapsed by default. These are groups are Ceiling Plenum Walls and Floor Plenum Walls.
-
Show/hide imported Floor Plan Images using the icon for the applicable Plan Image.
-
A Floor Plan Image from below may be viewed on levels that have no imported Plan Image.
Construction Search Bar
Use the search bar at the top of the Construction Tree to locate rooms, walls, windows, doors, skylights, roofs or other building elements when needed. This tool is especially useful when there are any calculation errors or warnings that must be addressed. Any portion of string may be used to search here.
Clear the search by clicking the X to stop hiding items when the search is complete.
Building Properties
Use Building Properties to view information about the building and level information. All Levels are displayed in the Building Properties and are sorted from top to bottom from highest to lowest elevation.
This screen is used to rename Levels, view and modify the Floor to Floor Height and Base Elevation of levels in the building.
The following information is provided and is not editable within this screen:
-
Building North
-
Building and Per Levels:
-
Gross Floor Area
-
Occupiable Floor Area
-
Conditioned Floor Area
-
Per Level:
-
Internal Volume
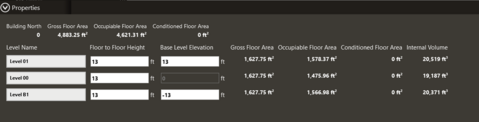
The following fields can be edited on this screen:
Level Name
Enter a unique user assigned name for the level here, if desired.
-
Default is Level NN, where NN represents the number of levels above grade. Level 00 may not be deleted in a project and is added automatically to a new project file.
-
Default is Level BN for levels below grade, where N is incremented as levels are added below grade. B1 is immediately below grade.
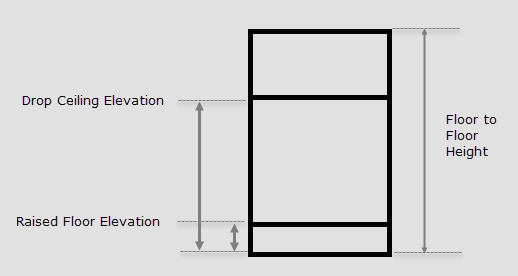
Floor to Floor Height
Height from the top of a slab on a level to the top of the slab on the level above it. Slabs are modelled geometrically with infinitesimal thickness.
|
Default: Based on what was entered on the Project Defaults screen or user input at time of Level creation.
|
|
Typical Range: 8 to 20 feet (2.4 to 6.1 m)
|
|
Min Max: 1 to 999 ft (0.3048 to 304.495 m)
|
|
Units: ft, m
|
Enter the floor to floor height of the level in this field to increase or decrease the height of rooms on the level.
Above Grade Levels
Increase of Floor to Floor Height on a given level shift all geometry above the modified level up by the entered difference. This action shifts the roof or inter-zone slab of the level above up. Ceiling plenum depth is increased where Drop Ceiling is present in rooms on the level.
Reduction of Floor to Floor Height on given level shifts all geometry above the modified level down by the entered difference. Reduction of Floor to Floor Height is limited by components of the rooms such as Drop Ceiling, Doors, Windows, and Raised Floor. This action shifts the roof or inter-zone slab of the level above down. Ceiling plenum depth is decreased where Drop Ceiling is present in rooms on the level.
Below Grade Levels
Increase of Floor to Floor Height on a given level shift all geometry below the modified level down by the entered difference. This action shifts the slab or inter-zone slab of the level being modified down. Ceiling plenum depth is increased where Drop Ceiling is present in rooms on the level.
Reduction of Floor to Floor Height on given level shifts all geometry below the modified level up by the entered difference. Reduction of Floor to Floor Height is limited by components of the rooms such as Drop Ceiling, Doors, Windows, and Raised Floor. This action shifts the slab or inter zone-slab of the level being modified up. Ceiling plenum depth is decreased where Drop Ceiling is present in rooms on the level.
There are rules in place prevention reduction of Floor to Floor Height to a point where windows or doors will be removed from rooms on the Level.
Occupiable height is also limited by these inputs to a minimum value of 6 inches or .160 m, depending on Regional Settings.
Plenum depths are limited to 3 inches or 0.080 m, depending on Regional Settings.
Ceiling Plenum is removed when Floor to Floor Height is reduced below the elevation of the Drop Ceiling.
When invalid input is attempted, input field is highlighted with red signifying an invalid floor to floor height. The allowable range will be displayed beneath the field.
Base Elevation of levels above the modified level are updated when the value is updated. Use TAB to submit the value.
Base Level Elevation
|
Default: Absolute Elevation of the top the of the Slab in rooms on the level
|
|
Typical Range: -50 to 500 ft (-15.24 m to 152.4 m)
|
|
Min Max: Dependent upon floor to floor height
|
|
Units: ft, m
|
Building North, Base Level Elevation, Gross Floor Area, Occupiable Floor Area, Conditioned Floor Area, Internal Volume
These fields cannot be edited and are for informational purposes only.
Level Properties
A read only view of following: Level Name, Floor to Floor Height, Base Level Elevation, Gross Floor Area, Occupiable Floor Area, Conditioned Floor area and Internal Volume for the selected level.
Use the breadcrumb to navigate between levels of the project.
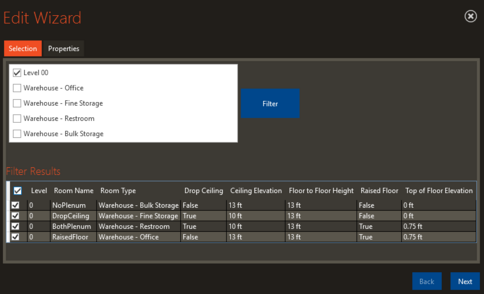
Edit Wizard
Use this tool to add, remove or modify Drop Ceiling and Raised Floor Elevations. Access the Edit Wizard at the bottom of the Construction Tree.
Selection Tab
Filter rooms to be modified from this Tab. Use this to refine what is added to the Filter Results. Filters include levels of the building and Room Types with assigned Rooms.
Select the subset of desired rooms to be modified and click Filter.

The filter results are populated in the Filter Results area.
Further refine the selection set of rooms using the checkboxes to the left of each row, or select all from the header row.
Click next to enter the Properties Tab.
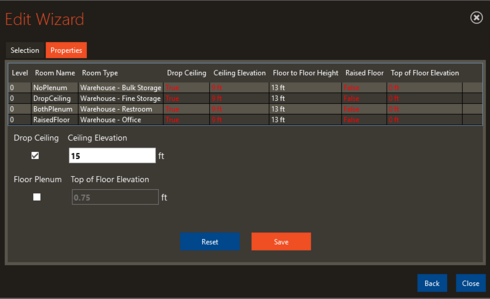
Properties Tab
Properties screen represents the current state of Drop Ceiling and Raised Floor for all rooms added from the filter. Changes applied here are applied to all Rooms selected.
Use the checkboxes to add or remove Drop Ceiling or Raised Floor from all rooms in this tab.
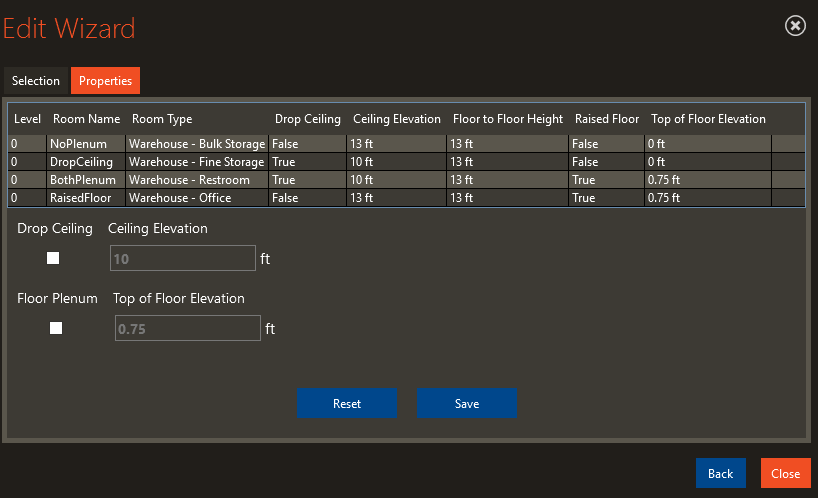
Ceiling Elevation and Top of Floor Elevation is used to modify elevation of these elements when the box is checked.
Use Save to apply the changes. Validation occurs to ensure the changes is valid. If accepted, table is updated in Green.
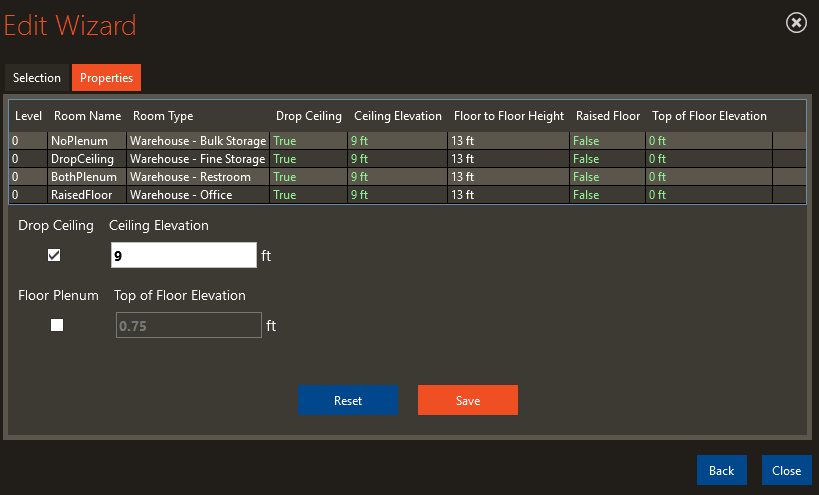
When invalid inputs are used, the table is updated in Red.
Use Reset to revert values to the start of the editing section.
Use Back to reapply Filters to the set of Room to be modified.
Use Close to apply the changes to the model.
Input Considerations:
The state of both Drop Ceiling and Raised floor is applied to all rooms being modified. Therefore, this tool should be used to apply consistent changes to all rooms in the selection set. Validation rules prevent drop ceiling from being applied at elevation greater than Floor to Floor height. Addition of drop ceiling removes doors or windows that no longer fit on the walls of modified rooms.