Weather Library
The Weather Library allows navigating to a specific world location to view and modify its characteristics.
The standard library includes EnergyPlus™ weather format (EPW) weather files from locations around the world which can be viewed, copied and modified to adjust to your specific needs and selections.
This screen includes World Regions, a navigation map and the ability to import weather files downloaded from an external source and located in your computer.
When in tile mode, scroll horizontally to navigate through the tiles. When in map mode scroll to zoom in or out from the map.
Clicking on the Tiles tab or the Map tab switches the view from the current mode to the other mode.
If in the Region portion of the tiles, navigate between regions using the dropdown in the breadcrumb trail on the top. To exit a Region, click on the base breadcrumb trail “Weather” to return to the full set of Regions.
Weather Data Source
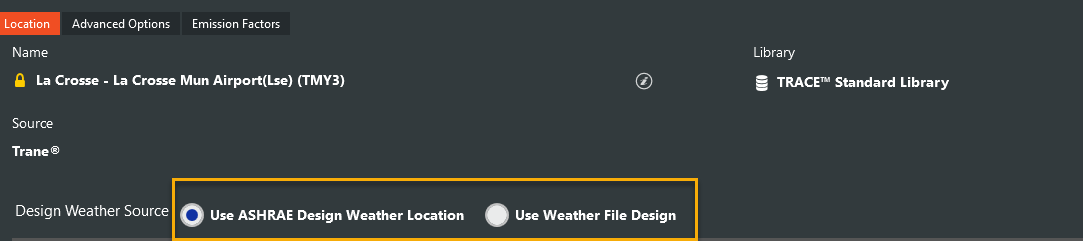
All weather locations in the library have two options for Design Weather source:
-
Use ASHRAE Design Weather Location
-
Use Weather File Design: design weather generated from the full year weather
When the Use ASHRAE Design Weather Location option is selected, TRACE 3D Plus uses design conditions from ASHRAE Handbook of Fundamentals 2013.
When the Use Weather File Design option is selected, the program scans the weather file (8760) and performs a statistical analysis to find the 0.4%, 1% and 2% design values for monthly and annual design weather.
For Load Design operating mode, TRACE 3D Plus does not run a full year weather file. It uses the design conditions that are selected in the library. Notice that the default option is the ASHRAE Design Weather Location.
The design weather conditions can also be overridden in the Building & Site -> Weather tab. Click on the edit properties (pencil) icon next the weather location and select User Override to input a design Drybulb and Wetbulb.


For the Energy and Economics version, TRACE 3D plus uses the selected 8760 weather file, whether it is imported or from the standard library.
To view the Site Outdoor Air Drybulb, Dewpoint, Wetbulb temperatures, Outdoor Air Humidity and Outdoor Relative Humidity is available generate on the Visualizer Report. To enable select Hourly as the Time Frequency on Select Series Variables Tab and calculating Energy and Economics.
Map
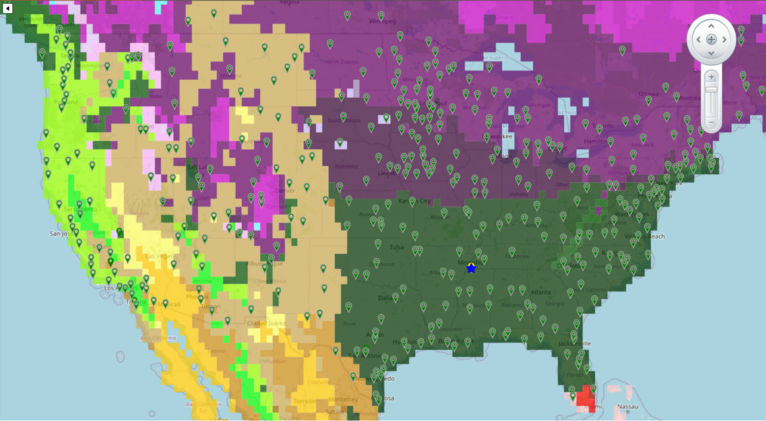
When the navigation map mode is selected, it allows you to navigate through the world map to select from available locations. Zooming and moving functions are available through the map control on the screen or with the mouse (scroll to zoom and click and drag to move).
When viewing the full world map, countries or large geographic regions are often shown condensed down to single points. Hovering over these points will indicate the number of actual points and the name of the country. Double clicking on the point will zoom in expand that portion of the map. To return back to the full world map Zoom out using the +/- vertical scroll bar. Pan around in the map by holding down the left mouse button and moving your mouse.
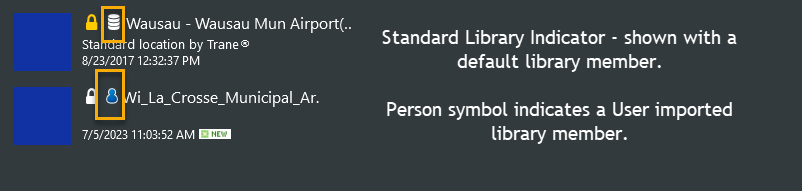
Pins represent existing locations in the library. Green Pins are EPW Standard locations which are included with the program installation and can’t be modified. A blue star represents the selected location on that specific alternative. Purple pins are custom locations that have been copied or imported by you and can be modified and yellow pins are selected locations in different alternatives in the project.
Refer to the Import help to see the supported formats.
AppBar menu - Found in the lower right hand corner of the screen. Press
When the AppBar triple dot menu is pressed, it will expand to include additional climate information. One possible selection is the CA Climate Zone button on the far left hand side. When selected it will display the following:
CA Climate Zones
|
Default Value: not selected
|
|
Typical Range: not selected - selected
|
|
Min & Max: NA
|
|
Units: NA
|
This option is functional when working in a file to select a weather location. This does not function when working only in the Library:Weather section.

This tool displays the California Building Climate Zones for Title 24 in the map. The Energy Commission established the 16 geographic climate zones for which typical weather, prescriptive packages and energy budget are established.
The CA climate zones are:
CZ 1: Arcata
CZ 2: Santa Rosa
CZ 3: Oakland
CZ 4: San Jose-Reid
CZ 5: Santa Maria
CZ 6: Torrance
CZ 7: San Diego-Lindbergh
CZ 8: Fullerton
CZ 9: Burbank-Glendale
CZ10: Riverside
CZ11: Red Bluff
CZ12: Sacramento
CZ13: Fresno
CZ14: Palmdale
CZ15: Palm Spring-Intl
CZ16: Blue Canyon
Koppen-Geiger
|
Default Value: not selected
|
|
Typical Range: not selected - selected
|
|
Min & Max: NA
|
|
Units: NA
|
This option is functional when working in a file to select a weather location. This does not function when working only in the Library:Weather section. This tool color codes the map to represent the different zones.
This tool displays the 2010 Koppen-Geiger climate classification in the map. There are five Main Climates represented with letters:
|
A:
|
equatorial
|
|
B:
|
arid
|
|
C:
|
warm temperate
|
|
D:
|
snow
|
|
E:
|
polar
|
Precipitation is labeled with the following letters:
|
W:
|
desert
|
|
S:
|
steppe
|
|
f:
|
fully humid
|
|
s:
|
summer dry
|
|
w:
|
winter dry
|
|
m:
|
monsoonal
|
Temperature is classified as:
|
h:
|
hot arid
|
|
k:
|
cold arid
|
|
a:
|
hot summer
|
|
b:
|
warm summer
|
|
c:
|
cool summer
|
|
d:
|
extremely continental
|
|
F:
|
polar frost
|
|
T:
|
polar tundra
|
Hide Compass
This tool allows you to hide the compass from the map.
|
Default Value: not selected
|
|
Typical Range: not selected - selected
|
|
Min & Max: NA
|
|
Units: NA
|
Use Offline
This tool allows you to work on the project offline, which allows for faster simulation time.
|
Default Value: not selected
|
|
Typical Range: not selected - selected
|
|
Min & Max: NA
|
|
Units: NA
|
Import
Weather files can be imported to be used in a project. Supported file formats are listed in the following table. There are several sources to download full year weather files for free such as DOE, NREL, Climate.OneBuilding, and some others that charge for location or regional download like ASHRAE's IWEC2, Meteonorm, Solar Anywhere, Solargis and CIBSE, among others. See NREL's website for more information. If you are calibrating a model to the utility bills of a specific year, expect to BUY weather data from a trusted source for the specific year you are calibrating to, and convert the data yourself into the Energy Plus epw format (Trane CDS will not support this process or recommend a source).
|
File Extension
|
File Type Description
|
|
tmy
|
Typical Meteorological Year (TMY)
|
|
tmy2, tm2
|
Typical Meteorological Year 2 (TMY2)
|
|
tmy3, tm3
|
Typical Meteorological Year 3 (TM3Y)
|
|
cst
|
Custom files
|
|
epw
|
EnergyPlus™ Weather Format
|
|
csv
|
EnergyPlus™ Comma-Separated-Values (CSV) files
|
|
iwc, iwec
|
International Weather for Energy Calculations format from ASHRAE (IWEC data files)
|
|
wy2, wyec2
|
WYEC2
|
|
dat, samson
|
Samson Data Files
|
|
bin
|
DOE2 binary weather format
|
|
fmt, txt
|
DOE2 FMT files
|
|
clm or esp-r
|
ESP-r Formatted (CLM) data file
|
|
blast or asc
|
BLAST ASCII Data File
|
|
wea
|
Ecotect wea Data File
|
|
sweara or swe
|
SWERA Data File
|
Pins in the map represent existing locations in the library. Green pins are EPW Standard locations which are included with the program installation and can’t be modified. A blue star represents the selected location on the current alternative. Purple pins are custom locations that have been copied or imported by you and can be modified. Yellow pins are selected locations in different alternatives in the project.
To import a weather file into TRACE 3D Plus follow these steps:
1. Open the Weather library

2. Select the import title (global region, nation, state).
3. Browse in your local computer the weather file with one of the supported formats. In the example below, a *.tm3 file was selected from the DOE2 site. The file downloads as a *.bin file. To import these files into TRACE, the file extension will need to be changed to match the type of the file downloaded. For example, if a TMY3 weather file is downloaded, the extension will need to be changed from *.bin to *.tm3.
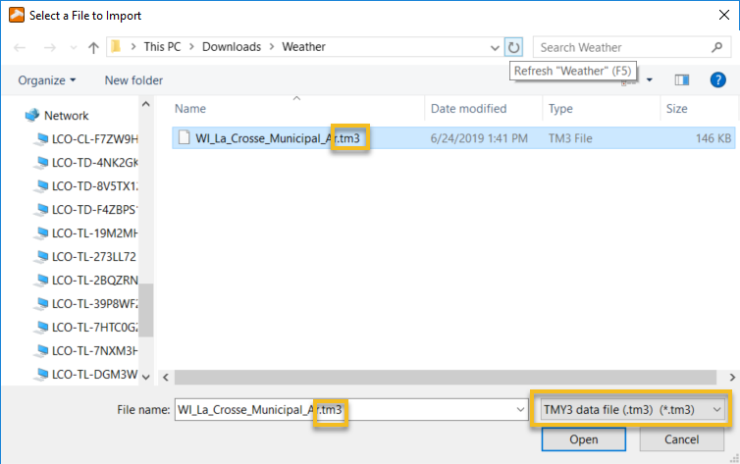
4. Click the import button.
5. Fill in the required information for country, state or city. This will only be requested if TRACE can't identify it from the file.

The weather file will be imported to the list of the subregion specified above. It will come in Unlocked. Open the file in the unlocked format in the library provides a space for the source and import date to be documented. Make any edits to the file before locking the file. The Library Filter defaults to “Both” referring to units. This can be edited with the dropdown to either SI, IP, or both. The file will be designated as “User-Defined” in the library. Lock the file once all changes are done to prevent accidental changes.

When the Use ASHRAE Design Weather Location option is selected, TRACE 3D Plus uses design conditions from ASHRAE Handbook of Fundamentals 2013.
When the Use Weather File Design option is selected, the program scans the weather file (8760) and performs a statistical analysis to find the 0.4%, 1% and 2% design values for monthly and annual design weather.
For Load Design operating mode, TRACE 3D Plus does not run a full year weather file. It uses the design conditions that are selected in the library. Notice that the default option is the ASHRAE Design Weather Location.
For Energy and Economics version, TRACE 3D plus uses the selected 8760 hour weather file, whether it is imported or from the standard library.
Custom Weather file will appear with a “User” image in lists instead of the standard library indicator.
Once the weather file has been imported, you can use the selection in your Trace file.
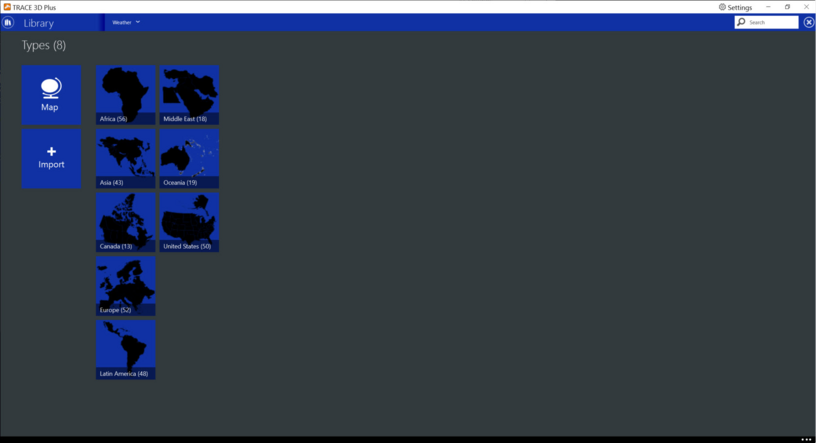
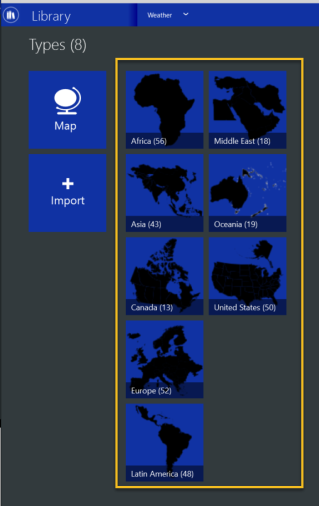
Regions
Each world Region contains a set of subregions to navigate. The United States and Canada contain states, provinces, and territories to select. The rest of the regions include countries. There are a total of eight subregions displayed on the Tiles view of Weather.
You can navigate between Regions using the dropdown on the breadcrumb trail on the top navigation bar. Return to the full list by clicking on “Weather” on the left of the top navigation bar.
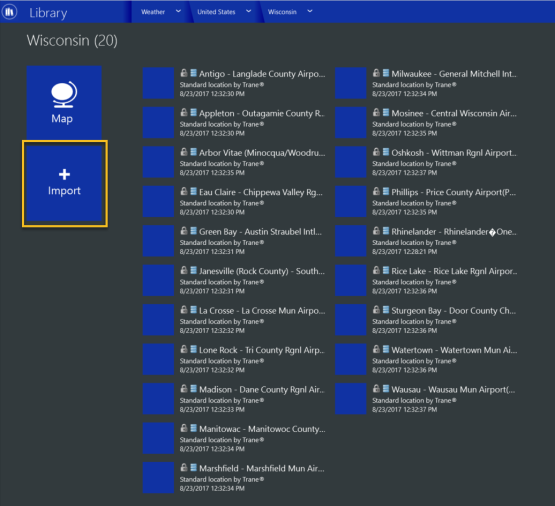
Subregions
Each country, US and Canada state, province and territory contains the city locations. Available epw files are default plus custom imported files.