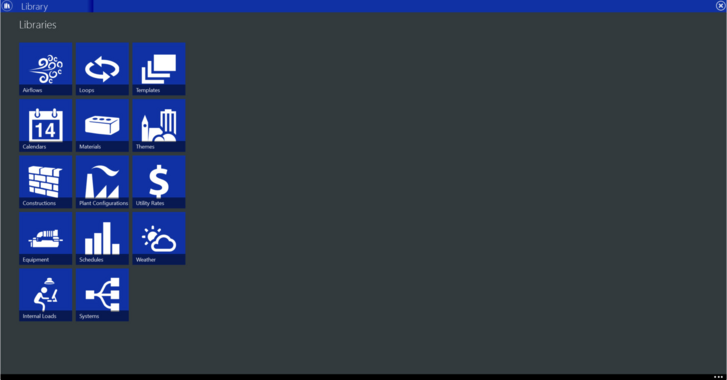
The General Library is the database which contains all of the library member data that can be applied to a project. The Library Categories in the program are:
This section will explain how to navigate through the library, its common functionality and organizational aspects. All library categories contain the following sections:
|
|
Breadcrumb
The top bar displayed in the library is the breadcrumb. This allows you to navigate between the different library categories, types, sub-types, and library members that exist in your library database. When working in the global library you will see the title “Library” to the left of your Breadcrumb trail. The base library can be closed by clicking on the X on the far-right hand side of the top row..
Navigating
● In order to move down a level (deeper) into a library category, click on a type, sub-type tile or click the icon of one of the existing library members.
● To make a move within the same level, click the dropdown arrow to the right of each section list located in the breadcrumb. This will display the list of existing types, sub-types or library members that can be selected for viewing.
● To move up a level, click on a name in the dropdown list to the left of the existing open category. This will remove the levels below and display the type tiles, sub-type tiles or list of library members depending on the selected level.
AppBar menu
This menu appears as a three-dot ellipse when closed and as a downward pointing arrowhead when open. It is found in the lower right-hand corner above the time and date. The bottom AppBar exists throughout the whole application and contains functionality that is applicable to the screen you are currently viewing. Functions may appear or disappear depending on what part of the program you are in. Additional items that are part of Create Building, Weather, or Library Tabs will only show when you are in that part of the program.
Preferences
Will pop open your Settings menu. The Library section of Settings includes multiple Display Filter and view format options. Available Standards can be selected or hidden in the Standards Filter section.
Project log
Appears only while in a project file. It allows you to keep notes of changes that have been made to the project. Clicking the Notebook icon on the right moves the current entry to the history log. The history log contains the text entry, the username, and date. Clicking the arrow on the right exports all notes into a .txt file for external use. Notes are stored in the log with the oldest on top. Individual notes can be deleted within the project log. See Program Preferences for more information.
Project Details
This covers the Project Name, Location, Building Owner, Program User, Company, and a free text Comment field. There is a pencil icon on the left. This allows the user to select a different image for the building. This is the image that will be used on the title page.
Import
This option only appears when you are in a subset of the library. It allows you to add library members to the library. Only Trace 3D+ exported library files in the .trl format may be used for importing. Library categories will appear as tabs allowing you to select the types, sub-types, and /or library members to import. When applicable, any dependent library members will be imported to make sure all selected library members are valid (for example constructions that have dependent material layers). When library members with the same name exist in the receiving library, you will be given the option to rename or skip the library member.
Export
This option only appears when you are in a subset of the library. Allows you to share library members with others or backup libraries for storage. The export will create a Next Generation TRACE export library file with an .mdf extension. Library categories will appear as tabs allowing you to select the types, sub-types, and /or library members to export. When applicable, any dependent library members will be exported to make sure all selected library members are valid (for example constructions that have dependent material layers).
Add
This function only appears when you are a library subsection. All new library members will be custom and will be placed outside of any existing Groups. Additional AppBar tools will appear when you are editing new library additions. You must give the new library member a unique name and enter any required information for it to be valid and saved.
Search and Filtering
The search area is available throughout the entire Library, except at the main library level. Searching and filtering allows you to locate specific library members quickly. Search results will depend on the level that you are at. For example, if a search is done while viewing a specific library member in its detailed properties screen, the program will display results of other library members matching the criteria. The same search criteria entered at the library type level, will return results from any type within the same library category.
Filtering of the search results is available once you have a list showing. The filter icon will then show. Selecting the filtering icon provides the following search options; By date and By user.
Types and Groups
The library has the following hierarchy levels.
Category
This is the highest and most inclusive level of the library. It divides library members by their major area of application. The existing categories in TRACE are Airflows, Calendars, Constructions, Equipment, Internal Loads, Loops, Materials, Plant Configurations, Schedules, Systems, Templates, Themes, Utility Rates and Weather.
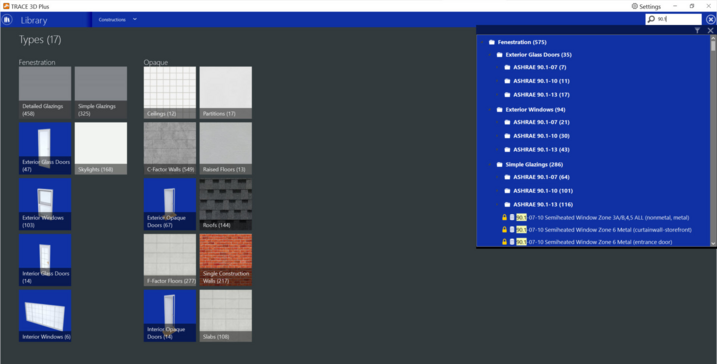
Type
These are fixed groups of libraries that cannot be edited. The groups are used to organize the library members within a specific category according to their application within the project. For example, the Internal Loads category has the following types: People, Lights and Miscellaneous Equipment. They are displayed as column groups under the categories’ main screen.
Sub-type
When applicable, this level will organize the library members further to help minimize long library member lists in the project. The sub-types are displayed as tiles on the screen. For example, the Weather category has the United States as a type and then the 52 states and territories as sub-types.
Group
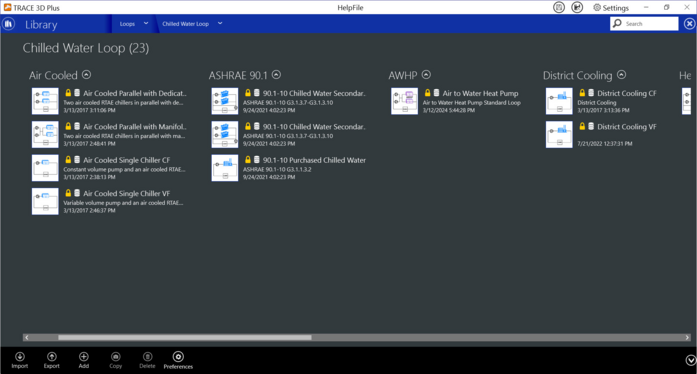
Groups allow us to sort library members to make it easier to search through the library as well as to export library members by group. Groups can be collapsed and open to reduce scrolling on screen using the up /down arrowhead button by the group name. You can create your own groups and move custom libraries between groups. Simply select the Add group button and rename it. Move items to new groups by holding down the left mouse button and dragging the item to any group that is open. The group area will color change when the member is far enough inside the group for the move to happen.

Library Member
This is the lowest level of the library and contains a list of library members. Library members will be organized alphanumerically by default. At this level, you can also create custom groups which serve as folders to organize their library members. Note that some library types will have standard pre-created groups which are helpful when applying library members in a project. An example is the Loops library shown below.
Detailed Properties Area
This area will display the properties of the library member in view. Each library category and type will have specific properties however the following fields, icons and buttons are common to all library members.
|
|
|
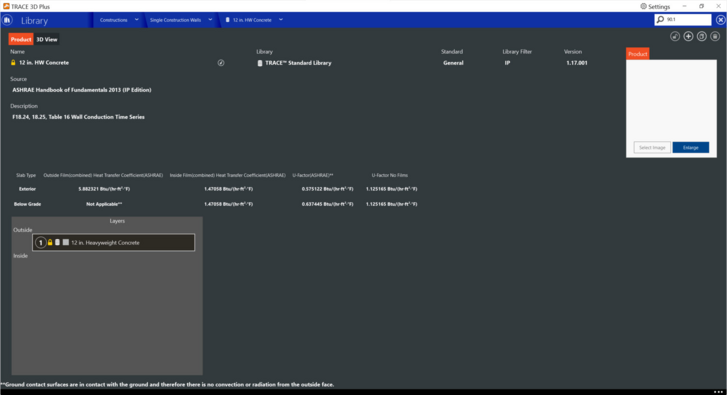
Library member name
This is the text field that displays a unique library member identifier. The library name will be used to select the library member in the project.
Source
This field shows the origin of the information in the library member. For standard library members, C.D.S. will provide the source of information, such as the ASHRAE handbook, industry code, database, or other industry source. Equipment imported via TSA will provide the TSA version used when the selection was made and the model number for the selected unit. For custom library members, this is a free text field you may provide any information that will help you remember where the information was obtained.
Version
The version consists of three digits, X, Y, Z. Where X is the program version, Y is the library schema version and Z is the number of times the library member has been edited.
Description
It is a text field that allows you to type in pertinent information about the library member.
Library Filter
Allows you to define which unit group the library member will be stored in. The filter is selected in the Program Preferences section and determines the list of library members that can be viewed in the library. The options are: SI, IP or both.
Library
Shows if the library member is a Standard or User Defined library member. Any standard library member will display a barrel icon and a custom library will display a person icon. Standard library members are installed with the program and cannot be edited.
Lock/unlock icon
This button allows users with the correct login rights to lock and unlock a custom library member. Locking will restrict users with lower login hierarchy from editing the library member.
Information icon
Displays, upon hover, the user and date for when the library member was last modified.
Copy button
This button will be in the upper right corner of the screen. It is available in the library member details screen and is displayed in the bottom AppBar when this feature is available. Copies can be created while in the library member detailed properties area or in the types and groups screen where the list of existing library members is displayed. All the information of the copied library member will be transferred to the new library member. A default name of “Original library member name - Copy” will be assigned but can be immediately changed. Any standard library members that are copied will be converted to custom library members that are editable.
Delete button
This button is in the upper right corner of the screen. It is available in the library member details screen and is also displayed in the bottom AppBar when this feature is available. It allows you to remove library members from the database. Note that dependent library members will not be deleted with parent objects (for example, material library members are not deleted when a construction library member is deleted).
Add button
This button is located in the upper right corner of the screen. It allows you to create a new library member from scratch. It is available in the library member details screen and is displayed in the bottom AppBar.
Project Library
There are two types of Libraries in TRACE 3D Plus:
1. Project library: The project contain in itself all the libraries that it needs. These are called the Project libraries. They can only be accessed through the project, they are not stored on the global library.
2. Global Library: All the libraries standard and custom that reside in the Library section of the program not dependent of any project.
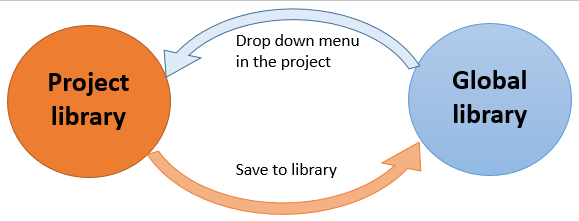
To save a project library into the global library, we need to select the library icon next to the library in the project.
This will open the Project Library which has a red top bar. Here you can see the properties of the library, but you cannot edit them. You need to click on the “Edit in Library” button. This will import your project library to the global library (the top bar will turn blue). In this way you can modify the library, save it to the global library and use it in another project. This can be done one library at a time.

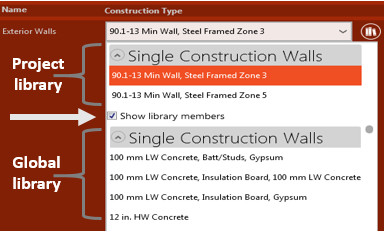
To bring a global library into your project, go to the field and select the dropdown menu, the project libraries including the current selection will show on top of the checkbox “Show library members”. When you click that checkbox, the global libraries will be listed under the “Show library members” checkbox. When you select any global library to add it to your project, that library will become part of the project so it will be displayed on the top part of the drop-down menu.
A global library with the same name as a project library will not be shown on the bottom list since the item is already in the project library.
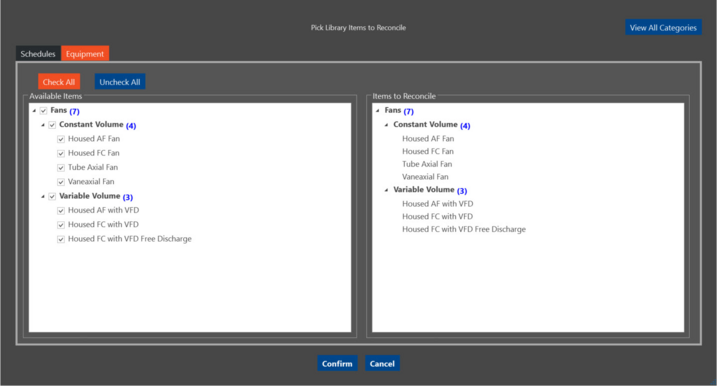
Library Reconciliation
This screen can be displayed when opening a file. It means the program found a global library member with the same identifier as the library in the project being opened with a different date or version. You have the option to update the project libraries that have checked boxes. If left checked, objects in the global library will override the current project information. In most cases you should pick Cancel unless you know that your global library has a more current version than the library in the project.
Sharing Libraries
Since your project includes all the libraries that it needs, you do not need to archive nor export the library to send it to someone else with your project. However, it is still a good practice to export your custom libraries as a backup. Import / Export Library can be accessed through the AppBar menu (3dot menu) in the library.