Schedules
The schedules category will allow you to create and manage schedules that will be applied in different sections of the application (such as occupancy density, lighting, thermostat controls, equipment availability, etc. Schedules consist of three pieces: a day profile, a week profile, and an annual profile. The day profile contains information that defines values spanning a 24 hour period. Day profiles are combined into weeks which are then combined into a full year schedule profile. Since all files are run with full weather files, all schedules will need annual profiles for the following day types: Sunday, Monday, Tuesday, Wednesday, Thursday, Friday, Saturday, Holiday, Cooling Design, and Heating Design. All schedules are defined using the Year Schedule Editor.
 
There are seven schedule types:
 
 
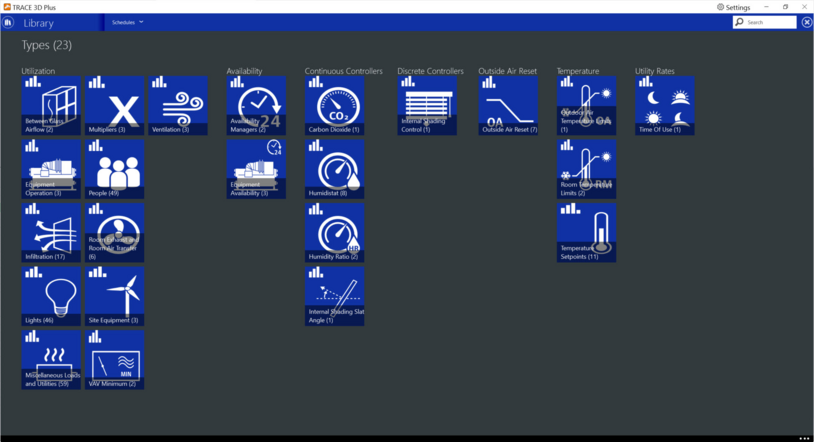
Each one has different schedule sub-types and utilizes different units to define how a variable changes throughout the year.


Year Schedule Editor
 
 
The schedule editor allows you to create the three necessary parts of a full year schedule. It follows the General Library Navigation but differs from other libraries by having a very graphical interface. When creating a new schedule you will be presented with a blank yearly profile.
 
The first step is to Add or Import a day profile by hitting the large plus sign on the top left side of the screen. The day profile screen will display the appropriate units and limits depending on the schedule type you are creating.
 
There are two types of day profiles: Continuous and Discrete.


Continuous Day Profiles
 
Continuous day profiles define the changes to variables with numeric values throughout a 24 hour period. The graph's Y axis variable will need to be defined; for example, temperature or percent. The X axis will be hourly values from midnight to 11:59 p.m.
 
The graphical interface will allow you to click on the graph to define a different value for the variable at each time step. In order to avoid times with no defined values, it will always extend the last defined value to the end of the 24 hour period. You can vary the time step to display the 24 hour period in 15 minute, 30 minute or 1 hour increments. You can also define the day profile using a detailed table displayed on the right side of the graph.


Discrete Day Profiles
 
Discrete day profiles define the changes to variables with discrete values throughout a 24 hour period. The Y axis will display the available discrete values for the variable; for example, On or Off. The X axis in the graph will be hourly values from midnight to 11:59 p.m.
 
The graphical interface will allow you to click on the graph to define a different value for the variable at each time step. You can vary the time step to display the 24 hour period in 15 minute, 30 minute or 1 hour increments.
 
You must create all of the different day profiles that will be assigned to the different day types in your schedule. For example, for a typical occupancy office schedule, you may need a day profile for the occupancy values during the work week and a separate day profile for the occupancy values during the weekend. All of the created day profiles will be displayed in the day profile list at the top of the schedule editor.
 
Once all of the necessary day profiles have been created, the second step is to assign each day profile to the calendar.


Calendar
The calendar section of the Year Schedule Editor, allows you the ability to assign the day profiles to all the required day types to define a full year. Day types are shown at the top going across the calendar and months are shown on the left side going down the calendar.
Day profiles from the day profile list can be dragged and dropped to the following sections on the calendar:
  • An individual day type - Dropping a day profile while hovering over the name of a specific day type will assign that day profile to it for the whole year. For example, dropping a day profile named “Weekday” while hovering over the “Monday” day type column will assign that day profile to all of the Mondays in the year. You will see the “Monday” column fill up with the color of the “Weekday” day profile.
  • An individual month – Dropping a day profile while hovering over the name of a specific month will assign that day profile to it for all of the day types. For example, dropping a day profile named “Winter” while hovering over the “January” month row will assign that day profile to all of the day types (Sunday, Monday, Tuesday, etc.) for the month of January. You will see the “January” row fill up with the color of the “Winter” day profile.
  • The weekend day types – Dropping a day profile while hovering on the word “Weekend” (shown above the Saturday and Sunday day types) will assign that day profile to the Saturday and Sunday day types for the whole year. For example, dropping a day profile named “Closed” while hovering over the word “Weekend” will assign that day profile to all of the Saturdays and Sundays of the year. You will see the “Saturday” and the “Sunday” columns fill up with the color of the “Closed” day profile.
  • The weekday day types – Dropping a day profile while hovering on the word “Weekday” (shown above the Wednesday day type) will assign that day profile to the Monday, Tuesday, Wednesday, Thursday and Friday day types for the whole year. For example, dropping a day profile named “Open” while hovering over the word “Weekday” will assign that day profile to all of the Mondays, Tuesdays, Wednesdays, Thursdays and Fridays of the year. You will see the “Monday”, “Tuesday”, “Wednesday”, “Thursday” and “Friday” columns fill up with the color of the “Open” day profile.
  • An individual day of the year – Each month row can be expanded to display each of the weeks and days of that particular month by clicking on the black arrow next to the month name. While the month is expanded, you can drop a day profile on a particular day of the year. For example, dropping a day profile named “Special Event” can be dropped to January 17th. This will assign that day profile to that 24 hour period. You will see the day box fill up with the color of the “Special Event” day profile.
 
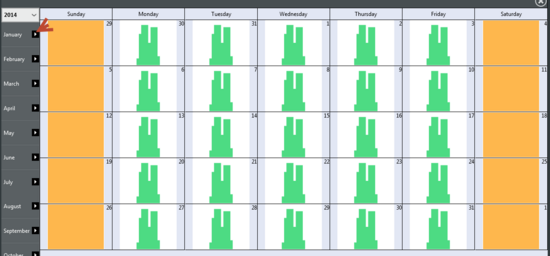
All calendar days need to have an assigned day profile. However, not all day profiles displayed on the day profile list need to be used.


Utilization Schedules
 
Utilization schedules designate the percentage of a peak value that should be applied throughout the year. There are thirteen sub-types:
 
Each sub-type will be displayed in its applicable section of the project. For example, schedules created under the People sub-type will be displayed in the Internal Loads tab of the Room Properties and in the Internal Loads template.
 
 
Adjacent Zone Airflow Utilization Schedules
These schedules are displayed in the Create Building sub-section under the Airflow tab/Airflow transfer section of the Room Properties. It will define the percentage of the room airflow that can be transferred. The default values for the day profile graph are:
Timestep: 1
Grid Interval: 5
Y Precision: 0
Y Min: 0
Y Max: 100
Y Units: %
X Min: 12:00 AM
X Max: 11:59 PM
X Units: time


Between Glass Airflow Utilization Schedules
These schedules are displayed in the Constructions Library under Exterior Windows and Glass Doors. It defines the percent of the maximum between glass airflow that should be flowing at a certain time of the year.
Timestep: 1
Grid Interval: 5
Y Precision: 0
Y Min: 0
Y Max: 100
Y Units: %
X Min: 12:00 AM
X Max: 11:59 PM
X Units: time
 
 
Equipment Operation Utilization Schedules
These schedules are displayed Systems section under the Configure Zone Equipment subsection when a Radiant Heat or Wall Convector zone equipment is added to a zone. They are used for radiant skin equipment that is controlled based on OA temperature.
Timestep: 1
Grid Interval: 5
Y Precision: 0
Y Min: 0
Y Max: 100
Y Units: %
X Min: 12:00 AM
X Max: 11:59 PM
X Units: time


Exhaust Utilization Schedules
These schedules are displayed in the Create Building sub-section under the Airflow tab/Room Exhaust section of the Room Properties. It defines the percent of the maximum exhaust flow rate that should be applied at different times of the year.
Timestep: 1
Grid Interval: 5
Y Precision: 0
Y Min: 0
Y Max: 100
Y Units: %
X Min: 12:00 AM
X Max: 11:59 PM
X Units: time
 
 
Infiltration Utilization Schedules
These schedules are displayed in the Create Building sub-section under the Airflow tab/Infiltration section of the Room Properties. It defines the percent of the maximum infiltration flow rate that should be applied at different times of the year.
Timestep: 1
Grid Interval: 5
Y Precision: 0
Y Min: 0
Y Max: 100
Y Units: %
X Min: 12:00 AM
X Max: 11:59 PM
X Units: time


Lights Utilization Schedules
These schedules are displayed in the Create Building sub-section under the Internal Loads tab of the Room Properties and in the Internal Loads template. It defines the percent of the maximum light density that should be applied at different times of the year.
Timestep: 1
Grid Interval: 5
Y Precision: 0
Y Min: 0
Y Max: 100
Y Units: %
X Min: 12:00 AM
X Max: 11:59 PM
X Units: time
 
 
Miscellaneous Loads and Utilities Utilization Schedules
These schedules are displayed in the Create Building sub-section under the Internal Loads tab of the Room Properties and in the Internal Loads template. It defines the percent of the maximum miscellaneous load or miscellaneous utility density that should be applied at different times of the year.
Timestep: 1
Grid Interval: 5
Y Precision: 0
Y Min: 0
Y Max: 100
Y Units: %
X Min: 12:00 AM
X Max: 11:59 PM
X Units: time


Multipliers Utilization Schedules
These schedules are displayed in the Configure Plants sub-section under the Components tab of the Loop Properties when a District Cooling or District Heating component has been added to the loop. It is also used in the Plants section under the Demand Loads tab of the Loop Properties. In either case, the schedule defines the percent of the maximum peak load or capacity that should be applied at different times of the year.
Timestep: 1
Grid Interval: 5
Y Precision: 0
Y Min: 0
Y Max: 100
Y Units: %
X Min: 12:00 AM
X Max: 11:59 PM
X Units: time
 
 
People Utilization Schedules
These schedules are displayed in the Create Building sub-section under the Internal Loads tab of the Room Properties and in the Internal Loads template. It defines the percent of the maximum People density that should be applied at different times of the year.
Timestep: 1
Grid Interval: 5
Y Precision: 0
Y Min: 0
Y Max: 100
Y Units: %
X Min: 12:00 AM
X Max: 11:59 PM
X Units: time


Site Equipment Utilization Schedules
These schedules are displayed in the Create Site sub-section under the Power-Using Objects toolbar. It defines the percent of the maximum power that should be applied at different times of the year.
Timestep: 1
Grid Interval: 5
Y Precision: 0
Y Min: 0
Y Max: 100
Y Units: %
X Min: 12:00 AM
X Max: 11:59 PM
X Units: time
 
 
VAV Minimum Utilization Schedules
These schedules are displayed in the Configure Zone Equipment sub-section under the Terminal Device tab of the System properties. It defines the percentage of the defined or calculated system air flow that should be applied at different times of the year.
Timestep: 1
Grid Interval: 5
Y Precision: 0
Y Min: 0
Y Max: 100
Y Units: %
X Min: 12:00 AM
X Max: 11:59 PM
X Units: time


Ventilation Utilization Schedules
These schedules are displayed in the Create Building sub-section under the Airflow tab/Ventilation section of the Room Properties. It defines the percent of the maximum ventilation flow rate that should be applied at different times of the year.
Timestep: 1
Grid Interval: 5
Y Precision: 0
Y Min: 0
Y Max: 100
Y Units: %
X Min: 12:00 AM
X Max: 11:59 PM
X Units: time
 
 
Water Heater Flow Rates Utilization Schedules
These schedules are displayed in the Configure Plants sub-section under the Components tab of the Loop Properties when a Stratified or Mixed Water Heater component has been added to the loop. The schedule defines the percent of the peak flow rate that should be applied at different times of the year.
Timestep: 1
Grid Interval: 5
Y Precision: 0
Y Min: 0
Y Max: 100
Y Units: %
X Min: 12:00 AM
X Max: 11:59 PM
X Units: time


Availability Schedules
 
 
Availability schedules defines when a piece of equipment or a control is On (available to operate) or Off (unavailable to operate). There are two sub-types: Availability Managers and Equipment Availability. Each sub-type will be displayed in its applicable section of the project. For example, schedules created under the Equipment Availability sub-type, will be displayed as part of the equipment properties in the Systems and Plants sections of the project.
 
 
Availability Manager Schedules
 
These schedules are displayed in the Configure Systems sub-section of the project under the Properties of a specific system. It will be displayed in the Availability Manager tab for controls that can be scheduled. Some examples of controls that can use these schedules are: Fan Cycling, Optimum Start and Night Purge.
 
Timestep: 1
Y value 1: On
Y value 2: Off
X Min: 12:00 AM
X Max: 11:59 PM
X Units: time


Equipment Availability Schedules
 
These schedules are displayed in the Configure Systems sub-section of the project under the Properties of a specific system. It will be displayed in the Components tab for equipment that can be scheduled. Some examples of equipment that can use these schedules are: Fans and Coils.
 
Timestep: 1
Y value 1: On
Y value 2: Off
X Min: 12:00 AM
X Max: 11:59 PM
X Units: time


Continuous Controller Schedules
 
Continuous Controller are schedules that define how a specific numeric value varies throughout the year. There are four sub-types:
 
Each sub-type will be displayed in its applicable section of the project. For example, schedules created under the Carbon Dioxide sub-type will be displayed as part of the system properties when defining demand control ventilation.
 
 
Carbon Dioxide Schedules
 
These schedules are displayed in the Configure Systems sub-section under the Outdoor Air Control tab. It defines the PPM setpoint for a system with demand control ventilation reset.
 
Timestep: 1
Grid Interval: 100
Y Precision: 0
Y Min: 0
Y Max: 2000
Y Units: PPM
X Min: 12:00 AM
X Max: 11:59 PM
X Units: time


Internal Shading Slat Angle Schedules
 
These schedules are displayed in the Construction Library under the Exterior and Interior Window constructions that have blinds as their internal shading option. It defines how the angle of a blind varies throughout the year.
 
Timestep: 1
Grid Interval: 10
Y Precision: 0
Y Min: 0
Y Max: 180
Y Units: degrees
X Min: 12:00 AM
X Max: 11:59 PM
X Units: time


Humidity Ratio Schedules
 
These schedules are displayed in the Configure Systems sub-section under the Controls tab of a specific system or loop. It will be displayed for applicable controls that control supply air reset based on humidity levels.
 
Timestep: 1
Grid Interval: 10
Y Precision: 0
Y Min: 0 (IP) / 0 (SI)
Y Max: 200 (IP) / 50 (SI)
Y Units: grains/lbm (IP) / g/kg (SI)
X Min: 12:00 AM
X Max: 11:59 PM
X Units: time


Humidistat Schedules
 
These schedules are displayed in the Configure Systems sub-section under the Controls tab of a specific system or loop. It will be displayed for applicable controls that control supply air reset based on humidity levels.
 
Timestep: 1
Grid Interval: 10
Y Precision: 0
Y Min: 0
Y Max: 100
Y Units: %
X Min: 12:00 AM
X Max: 11:59 PM
X Units: time


Discrete Controller Schedules
 
Discrete Controller are schedules that have specific options to define how a control or mode of operation changes throughout the year. There is only one sub-type: Internal Shading Control. Each sub-type will be displayed in its applicable section of the project. For example, schedules created under the Internal Shading Control sub-type will be displayed in windows and glass doors what have blinds or shades.
 
 
Internal Shading Control Schedules
 
These schedules are displayed in the Construction Library under the Exterior and Interior Window and Glass Door constructions that have blinds or shades as an internal shading option. It defines if the shading is active or inactive.
 
Timestep: 1
Y value 1: On
Y value 2: Off
X Min: 12:00 AM
X Max: 11:59 PM
X Units: time


Outside Air Reset Schedules
 
Outside Air Reset schedules are specifically used to set the reset temperature of air or water based on an outside air temperature. They are different from other schedules in that they can only have two setpoints. There is only one sub-type: Outside Air Schedules.
 
 
Outside Air Schedules
These schedules are displayed in the Configure Systems and Configure Plants sub-section under the Controls tab of a specific system or loop. It will be displayed for applicable controls that control supply air or water reset based on outside air temperature.
 
X Interval: 50
Grid Interval: 20
Y Precision: 0
Y Min: 0
Y Max: 200
Y Units: °F or °C
X Min: -200
X Max: 200
X Units: °F or °C


Temperature Schedules
 
Temperature schedules define how a temperature variable changes throughout the year. There is only one sub-type: Temperature Setpoints. Each sub-type will be displayed in its applicable section of the project. For example, some schedules created under the Temperature Setpoints sub-type will be displayed in the controls section of a loop that has a temperature shut-off control for a piece of equipment.
 
 
Temperature Setpoints Schedules
 
These schedules are displayed in the Building Create Zones under the Zone properties, in the Configure Systems, Configure Plants sub-sections under the Controls tab of a specific system or loop and also in the Equipment Library for equipment that can have variable temperature setpoints.
 
Grid Interval: 10
Y Precision: 0
Y Min: -10
Y Max: 200
Y Units: °F or °C
X Min: 12:00 AM
X Max: 11:59 PM
X Units: time


Utility Rate Schedules
 
Utility Rate schedules are schedules used in Time of Use Utility Rates. They define the rate type that should be applied throughout the year. There is only one sub-type: Time of Use.
 
 
Time of Use Schedules
These schedules are displayed in the Utility Rates Library for rates that define their consumption type as Time of Use.
 
Timestep: 1
Y value 1: Peak
Y value 2: Mid Peak
Y value 3: Shoulder
Y value 4: Off Peak
X Min: 12:00 AM
X Max: 11:59 PM
X Units: time